How To Guides for the Vaio F Series: |
Clean Install using the
OEM Recovery Discs |
Calibrate the Monitor |
Replace the Display
and/or the Inverter |
Replace The
Keyboard or Clean the Fan |
Add a
Secondary Hard Drive |
Replace the Main Hard
Drive | VAIO
F Series Disassembly Guide - Teardown |
3rd Party
Battery: $70/4 hours Battery Life!
![]()
How-to Replace/Upgrade Hard Disk Drive SSD VAIO F Series Notebook
|
Linking to this page: if you can, please use keywords in your links to help search engines results & use the normal URL found in the status bar of your browsers. Exception: forum.notebookreview.com (NBR) broke all links to the How-To articles hosted on this site by breaking all links starting with monteverde.org. If you want to link to this page on NBR, copy, paste & post this as a workaround: [URL="http://tinyurl.com/282qn3y"]How to Replace the Hard Disk Drive (HDD) of a VAIO_VPCF Series Laptop[/URL] Note: if you don't put an underscore between comercial words like Vaio F or F Series or Acer, etc, then NBR automatically parse the words with links to their coupons pages & break the intended links. Hence the Vaio_F. I can't do individual support (except for longtime F
owners friends) but if
you want to write to make suggestions or comments about this page or
just say Hello or thanks, please write to:
All the Vaio F content found here is in the process of being moved to this new dedicated mini-site: www.vaiofseries.com |
Upgrading or replacing yourself the hard drive or SSD on your Vaio F11, F12 or F13 is very easy. Whatever the storage capacity (500GB, 750GB or 1TB) as long as it's a 9.5mm thick 2.5" replacement hard drive or SSD, it will fit in the HDD OEM caddy & drive bay. A 1TB 12.5mm thick HDD does not fit in the caddy. It takes about 3 minutes to do and the only tool requiered is a small screwdriver. Many Vaio VPCF owners simply buy the Vaio F Series with the cheapest HDD in it, then find their favorite HDD or SSD for a lot less than what is offered by Sony as an upgrade, replace the drive and buy an external 2.5" hard drive enclosure to use the OEM HDD as a backup of for data storage. About cloning your old drive or making your Vaio F Series system even faster, leaner & meaner see Clean Install using the Vaio F OEM Recovery Discs - F11, F12 & F13. If you want to add a second hard disk drive to your Vaio F Series for more storage capacity or to work in tandem with a small SSD, check Add a Secondary Hard Drive to a Vaio F Series.
Tools:
- Magnetized small #0 Phillips
screwdriver (crosshead). Magnetized because it's much easier
 to extract the screws from deep holes instead of flipping over the notebook to get the screw out & it helps for reinstalling the small screws w/o dropping them because they stick to the magnetized screwdriver's point.
 - Clean working surface covered with a towel or clean rag to avoid scratching the Precious' lid and help catching the screws if you drop any.
Warnings:
- Never touch a circuit or electrical contacts with the screwdriver's magnetized point.
- When manipulating the hard drive, avoid touching the underside circuits with your fingers.
- Don't work over a shaggy rug as you may have to search for that tiny screw you've dropped.
- Get your curious pets out of the room (or not).
- As they say in USA: this coffee is hot and the floor is slippery and don't sue us if you try this DIY & mess up something in your notebook as you were warned: use this how-to guide @ your own risk. Note that unless you are very clumsy, it's very easy to do and it's not brain surgery.
1- Unplug the Vaio laptop
2- Remove the battery. Press the main power button for at least 5 sec. to drain the residual power.
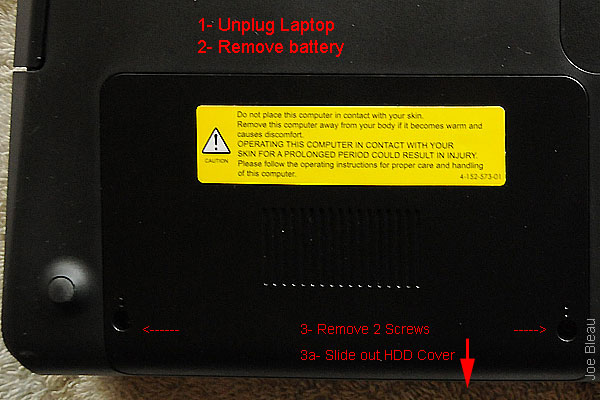
3- Remove the two screws securing the cover of the hard drive bay.
3a- Slide out the door horizontally.
4- Remove the two screws securing the hard drive caddy.
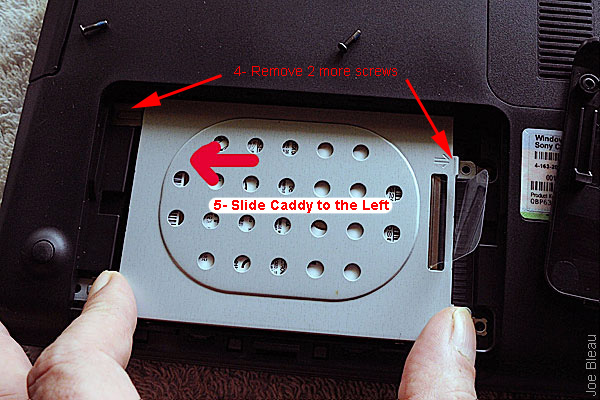
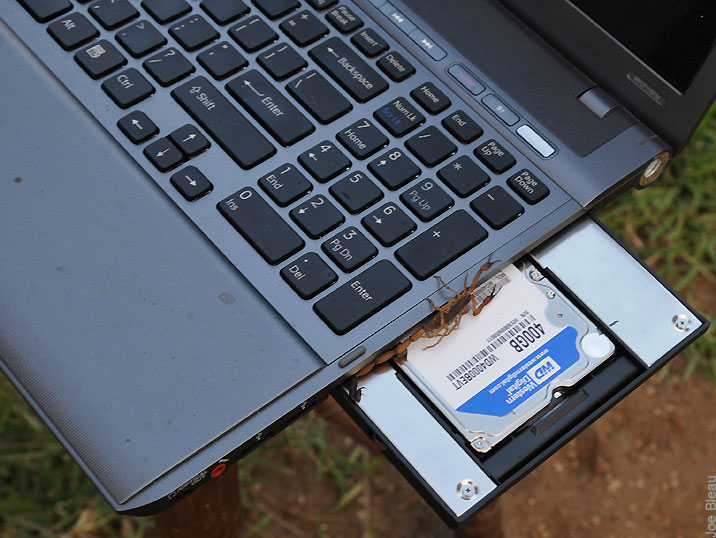
5- Slide the hard drive to the left to disconnect the drive. Don't try to lift it out before doing that or you will bend the connector's pins. Check the left side of the photo below: the metal screw tabs slide in holes made for this purpous in the notebook's plastic bottom cover. You may have to guide the tabs in the holes if they are bent or misalligned & preventing the caddy from being fully moved to the left to clear the HDD's SATA connector.
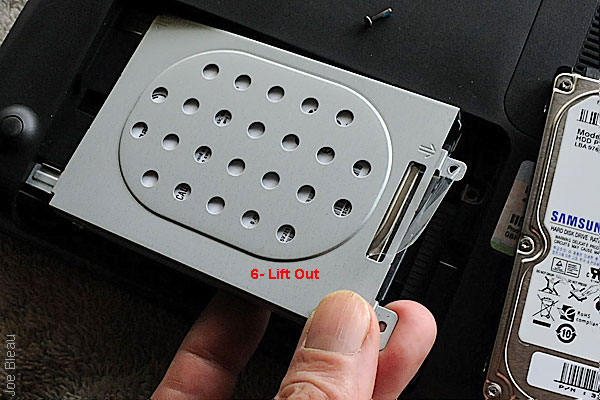
6- Lift the hard drive & it's caddy out. You can use the clear plastic tab to do this. Don't touch the HDD's underside circuits.
7- Remove the four screws fastening the drive to the caddy.
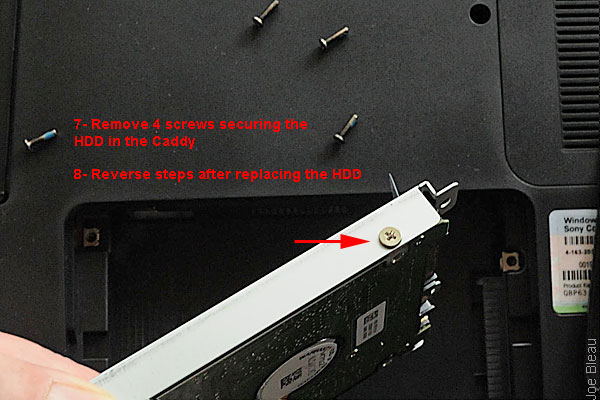
8- Reverse the steps to install your new hard drive or SSD drive.
---------------------------------------------------------------------------------------------------------------
Vaio F Series Windows 7 64-bit Clean Install Guide Using OEM Recovery Discs
------------------------------
How to install a secondary hard drive in the optical drive bay of a VAIO VPCF Series
--------------------------------------------------------------------------------------------
Vaio F Series Laptop How To Replace the LCD Display & Inverter
---------------------------------------------------------------------------------------------------
Vaio F Series Monitor Calibration and Users Created Profiles Roundup

-----------------------------------------------------------------------------------------------------
Vaio F Series - How To Replace the Keyboard & Clean the Fan
-------------------------------------------------------------------------------------------------------
How To Guides for the Vaio F Series: |
Clean Install using the
OEM Recovery Discs |
Calibrate the Monitor |
Replace the Display
and/or the Inverter |
Replace The
Keyboard or Clean the Fan |
Add a
Secondary Hard Drive |
Replace the Main Hard
Drive | VAIO
F Series Disassembly Guide - Teardown |
3rd Party
Battery: $70/4 hours Battery Life!
![]()
You can contribute to the VaioFSeries.com mini-site I'm currently building by clicking
Joe Bleau's avatars:
![]()
![]()
![]()
![]()
![]()
![]()
![]()
![]()
![]()